How to Dial In/Calibrate Espresso
tai attitude9 min read
Dialling in espresso refers to the process of a barista fine-tuning espresso to obtain a recipe that brings out the best potential of coffee beans.
This obtained recipe, to be used as a guide for espresso preparation throughout the day, helps ensure the highest brewing quality and unwavering consistency for every cup.
Because different coffee beans have different physical and chemical properties, this presents the opportunity and the need for a barista to dial it in specifically. The goal is to find its best settings of dose, yield, and grind size for espresso-making.
Every time a coffee bean is dialled in, a new recipe specific to it will be obtained.
The obtained dialled-in recipe will continue to serve its effectiveness until the emergence of either one of the following events necessitates a need to dial in anew:
• For the same batch of coffee beans used, there is a consistent shot-to-shot change in the overall taste.
• A new batch of coffee beans is loaded into the espresso grinder.
This article serves as a tool for helping baristas obtain a dialled-in recipe for their coffee beans in use. Covering the requirements and the three parameters that are determinants of quality (deliciousness) in steps: dose, yield, and grind size.
Requirements
Barista's sensory
Tasting the espresso will give the barista sensory information about what it is and help them navigate the next step.
Espresso is a relatively strong beverage; our sensory fatigue will start to kick in quickly after sipping a few. Therefore, it is crucial to evaluate the espresso when our senses are sharp.
For reasons above, use a spoon to stir the espresso for evenness before tasting; aim to take only one sip per espresso, up to a maximum of five different sets. Be deliberate and have fun.
Tools
i. Espresso grinder and espresso machine. Free from rancid stains and are in good working order.
ii. A tamping tool of the correct fit for the filter basket. A flat tamper or an automatic tamper.
As long as it can create an even, flat espresso puck.
iii. Two weighting scales that are capable of measuring 0.1 decimal places. One to weigh the dose (ground coffee), the other to weigh the yield (espresso). Digital weighting scales or built-in gravimetric scales on espresso grinders or espresso machines.
We highly recommend using gravimetric measurements, as they are accurate.
iv. A timer to measure brew time if the weighting scales or espresso machine do not have it built in.
Ingredients
i. A well-rested (degassed), good-quality whole coffee beans. A single origin or a blend.
ii. Clean-tasting water from the group head of the espresso machine.
iii. Milk and milk pitcher, for the optional step.
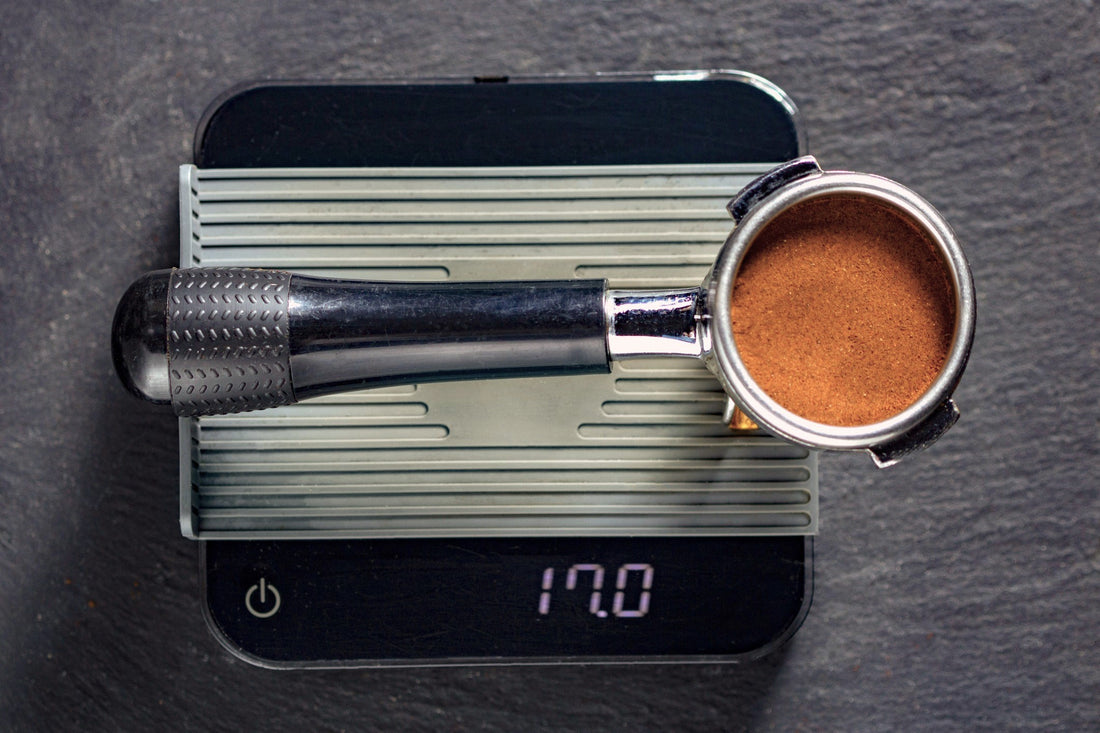
Step 1: Dose (Deciding Strength)
The dose refers to the amount of ground coffee fitted into the filter basket attached to the portafilter.
There are three factors to consider in sequence when deciding the dose.
From most to least impact: filter basket capacity > roast level > freshness
Filter basket capacity
Filter baskets typically come in 7g, 15g, 18g, 20g, 22g, and 25g capacities, where a proportional amount of ground coffee can fit within them.
The key is to dose a suitable amount of ground coffee according to the capacity of your filter basket. Get a clear idea of its capacity by dosing and weighing the amount of ground coffee it can hold.
For example, in this use case,
Let's say it is identified as a 20-g filter basket, then proceed to utilise around 20-g. In the case of a 22-g filter basket, then use around 22-g.
We say "around" for now because there are two other factors that will narrow it to the precise dose value. So, keep reading.
Roast level
Lighter roasts possess lower solubility compared to darker roasts. Hence, the subsequent consideration entails identifying the roast level of the coffee beans used.
Now, we would want to give our filter basket capacity an arbitrary ±1g dose range.
For example, in this use case, we are using the 20-g filter basket.
For lighter-roasted coffee beans, since they are lower in solubility, use a lower dose (less ground coffee) to allow water to have a greater chance for proper extraction. Start with the lower limit of 19g.
For medium-roasted coffee beans, their solubility falls in between. Start with 20g.
For darker-roasted coffee beans, since they are more soluble, using a higher dose will not hinder extraction. Start with the upper limit of 21g.
Next, let's explore the final factor.
Freshness
Carbon dioxide (CO2) is trapped in coffee beans during roasting and takes days to gradually dissipate. The excessive presence of CO2 during brewing hampers extraction efficiency by acting as a force to repel water.
To give a general idea,
Fresher coffee beans have more CO2, and using a lower dose (less ground coffee) allows for a greater chance for water to extract with ease.
On the contrary, the longer coffee beans have been since their roast date, the less CO2 they have left; thereby, using a higher dose will not be a hindrance over time.
In short, for the same batch of coffee beans, try increasing its dose incrementally by +0.2g as each day goes by.
 Once the dose is determined, keep it locked for now, then proceed to Step 2: Yield.
Step 2: Yield (Deciding Balance)
The yield refers to the weight of the espresso liquid output into the cup.
The espresso brew ratio (EBR) represents the ratio of ground coffee to water.
A 1:2 ratio is a good starting point for espresso. For every one gramme of ground coffee, add two grammes of water.
For example, let's say we are using a 19g dose; the yield to aim for would be 38g. If the dose is 21g, the yield would be 42g.
Time to brew and taste the first espresso.
Key action: Keep the dose locked; aim for 1:2.
 As a rule for Step 2, please ignore improper strength or brew time, which we will soon achieve in Step 3.
It is totally okay if the espresso is not perfect tasting—having too fast or too slow of a brew time as we are currently halfway through.
For now, focus solely on tasting the balance of acidity, sweetness, and bitterness in the espresso; let nothing else get in the way.
Good balance is typically achieved at 1:2.
If the espresso tastes balanced, proceed straight to Step 3: Grind Size.
If not, refer to the following for the next course of action:
• Using less water will result in more perceived sourness and less bitterness. (lower extraction)
• Using more water will result in less perceived sourness and more bitterness. (higher extraction)
Time to brew and taste the second espresso.
Key action: Keep the dose locked; accordingly, adjust the yield by (±2g) based on the above.
If it tastes balanced, proceed straight to Step 3: Grind Size.
If not, further adjust the yield more or less accordingly. Repeat this until the espresso achieves balance in the three tastes.
On a side note, channelling is something to look out for. Use a naked portafilter to spot channelling, or, in an old-school way, taste the espresso to identify it.
If channelling happens, discard the espresso shot; do not take the sensory information from it as it is deemed inaccurate. Rather, continue proceeding to prepare for the next shot.
Channelling is when, during brewing, water finds a narrow path through the espresso puck instead of flowing through the entire espresso puck evenly. Channelled espresso tastes unbalanced in acidity and bitterness, lacks sweetness, and is thin in mouthfeel/tactile.
Step 3: Grind Size (Deciding Strength & Balance)
Grind size determines the available surface area and resistance of the ground coffee.
In addition, brew time correlates best with grind size. Observing brew time is a way to tell whether it is currently too fine, just right, or too coarse.
So, finer or coarser?
• Using a finer grind exposes more surface area of ground coffee to water, increasing brew time and resulting in a thicker and more bitter espresso. (higher strength and extraction)
• Using a coarser grind exposes less surface area of ground coffee to water, decreasing brew time and resulting in a thinner and more sour espresso. (lower strength and extraction)
For a change in grind size setting on the grinder, be sure to purge the grinder to clear out older grind residue inside it.
Time to brew and taste the next espresso; this time, focus on its strength and overall balance.
Key action: Keep dose and yield locked; adjust the grind size based on the above to target the brew time in between 24-32 seconds.
If the espresso tastes delicious, you are set.
If not, further adjust the grind size, finer or coarser, accordingly. Repeat this until the espresso achieves the ideal strength (neither too thick nor too thin) and overall balance (acidity, sweetness, and bitterness).
If the espresso is still slightly off balance by this point, keep the dose and grind size locked, but fine-tune Step 2: Yield a little more or less accordingly (±2g) until it is right. And it will be.
 Once you get the delicious espresso, write the recipe down and stick it on the espresso grinder for the team's reference.
Optional Step
With the ever-increasing popularity of milk-based coffee, some coffee shops have two dialled-in recipes for both black and white coffees, respectively.
The main reason is because milk contributes its own unique aroma, taste, mouthfeel, and overall flavour. Milk can either overpower the espresso or the espresso overpowers it.
The key is good synergy between these two ingredients for a delicious milk-based coffee.
Assuming milk quality and volume are constants, the strength of the espresso is what's left to determine such synergy. Consequently, for milk-based beverage dialling in, our focus is diverted to strength.
To do this, prepare a milk-based beverage of choice by using the dialled-in espresso recipe.
If the milk coffee tastes great, this indicates the espresso has just the right amount of strength. Proceed to use the same recipe for both black and white coffees. You are set.
If the milk coffee tastes too "milky" or too "espresso", refer to the following for the next course of action:
Assuming milk quality and volume are constants,
• Using more ground coffee will result in a thicker espresso and, therefore, stronger milk coffee. (higher strength)
• Using less ground coffee will result in a thinner espresso and, therefore, weaker milk coffee. (lower strength)
Key action: Keep yield and grind size locked; accordingly, adjust the dose by (±0.5g) based on the above.
If necessary, repeat this until the milk coffee achieves the desired strength. And it will be.
 Once you get the desired espresso recipe dedicated to milk-based coffee, write this second recipe down and stick it on the espresso grinder for the team's reference.
In summary
The purpose of dialling in is to bring out the utmost deliciousness of the coffee beans we are using.
Filter basket capacity, roast level, and freshness are factors to consider when deciding the dose. Within the confines of these three factors, the higher the dose, the stronger (higher strength) the espresso will be.
The amount to yield determines the balance of acidity, sweetness, and bitterness in the espresso. Less yield skews towards sourness; more yield skews towards bitterness.
Grind size further determines the strength and overall balance of the espresso. Observing brew time is a way to indicate whether it's too fine, just right, or too coarse.
When dialling in espresso for milk-based beverage, the strength of espresso plays a more important role. Dose is the best parameter for altering the strength of espresso.